Taking the complexity out of cylinder break-in
From time to time, every piston aircraft owner faces the question of how best to break-in new cylinders. Sometimes this involves just one or two newly-replaced cylinders, other times all cylinders have been replaced simultaneously (“top overhaul”), and yet other times the entire engine has been major overhauled or exchanged for a new or rebuilt. Regardless, the cylinders must be properly broken in. It’s not hard to do this, but it’s also not hard to screw it up and that can be a costly and frustrating mistake.
If you Google the phrase “aircraft cylinder break-in” you’ll be amazed at how much has been written on this subject. Each engine manufacturer has a service bulletin to provide guidance on how to do this (e.g., Continental M89-7R1, Lycoming SI 1427B), as do manufacturers of PMA cylinders (e.g., ECi, Superior). Many well-known engine overhaul shops provide their own break-in instructions (e.g., RAM, Penn Yan, Victor), and various type clubs have also weighed in on the subject. Even Shell Oil has written its own break-in recommendations.
If you digest this myriad guidance, you’ll probably find yourself seriously confused. Although there are some common threads that everyone seems to agree about, there’s an awful lot of stuff that they don’t. There’s very little agreement about such basic things as what power settings to use, what kind of oil to use and how soon to change it, and how long the break-in process should take. There’s lots of contradictory advice out there, and it’s hard to tell what portions have a sound engineering basis and what are old wives tales.
As an aircraft owner for more than 50 years, I’ve broken in my share of cylinders. As an A&P/IA with a sizeable piston aircraft maintenance management practice, I’ve advised thousands of other aircraft owners how best to do it. Trust me, it’s not nearly as difficult or complicated as the literature might make it seem.
How cylinders are made
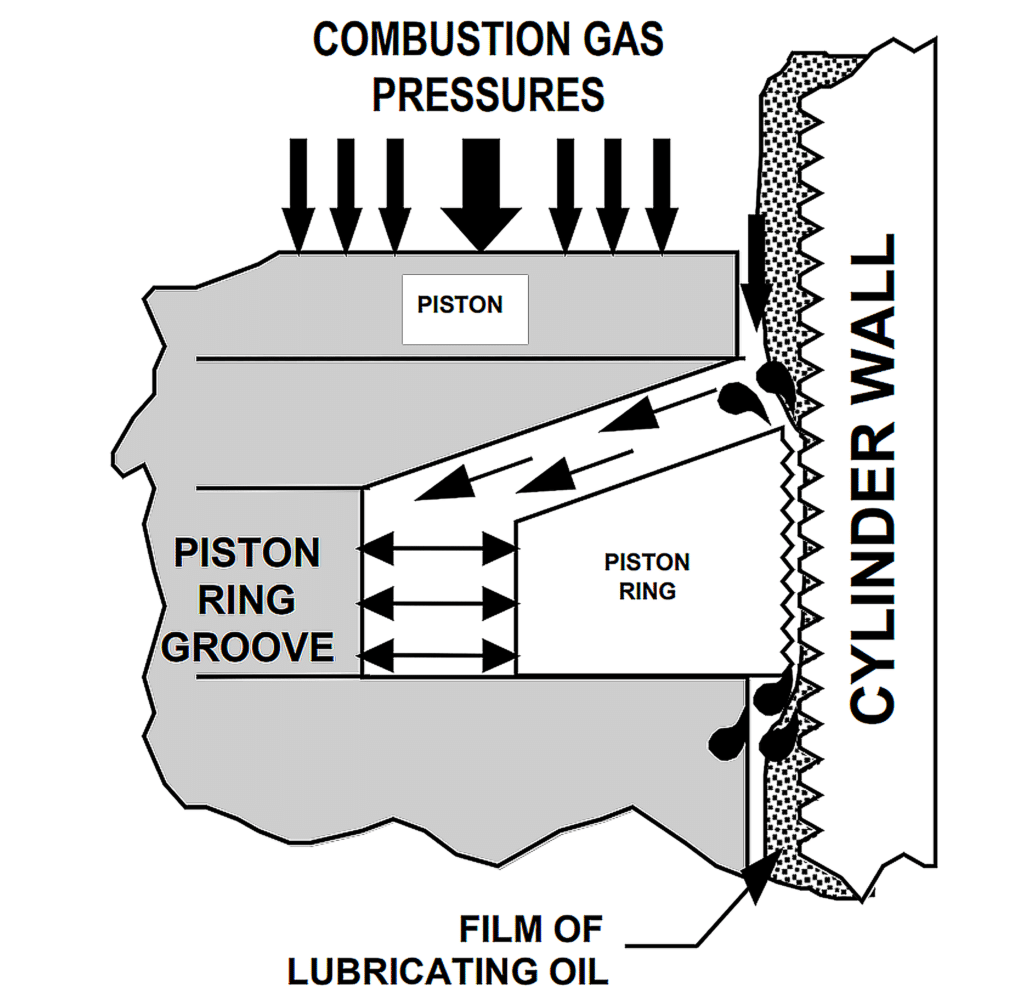
Most cylinders are manufactured from a forged steel barrel mated with an aluminum alloy head casting. A grooved aluminum alloy piston reciprocates within the steel barrel. A pair of chrome-plated steel compression rings are set into the piston’s topmost grooves to provide a reasonably gas-tight seal between the piston and barrel (thereby creating a viable combustion chamber). To achieve acceptable cylinder longevity, the piston is equipped with a third slotted ring—known as the oil-control ring—that continually applies and distributes a thin film of lubricating oil on the surface of the barrel. As the piston reciprocates inside the barrel, the compression rings hydroplane on this oil film. This prevents most metal-to-metal contact between the rings and the barrel, minimizing friction and wear and greatly prolonging the lifespan of the cylinder assembly.
If the story ended there, no cylinder break-in would be necessary. But of course, it doesn’t end there.
When the forged steel barrel is initially machined at the factory, it comes out of the CNC machine with a mirror-smooth interior finish. This won’t do, because it’s impossible to coat a mirror-smooth steel surface with a thin film of oil. If you try, the oil “beads up” into discreate droplets, much in the way that water beads up when applied to a freshly waxed surface. Engineers say that the mirror-smooth steel surface is not “oil-wettable.”
The need for break-in
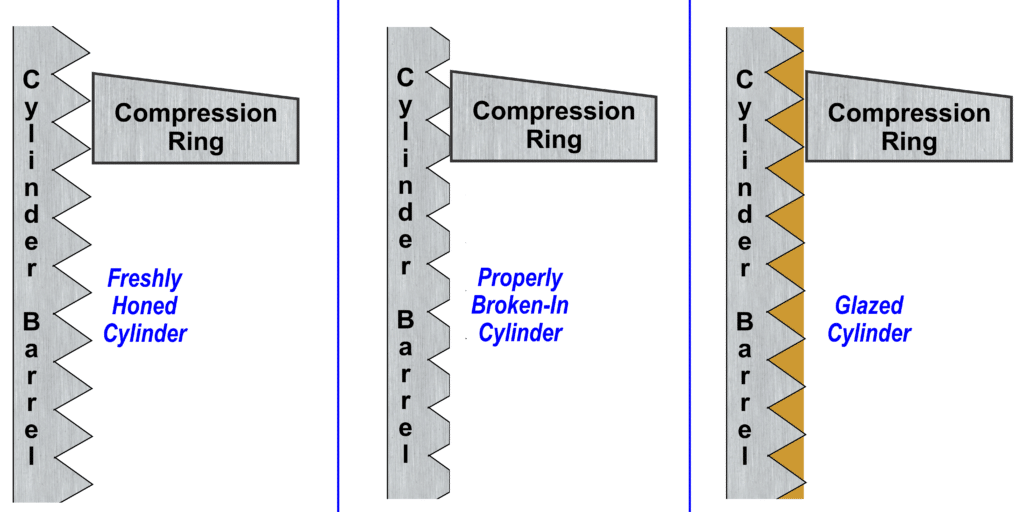
To make the barrel oil-wettable, its surface must be roughened very slightly. This is accomplished by finishing the inside surface of the barrel with a special honing tool that uses very hard 220-grit stones to create a crosshatch pattern of tiny scratches—a so-called “microfinish” because the scratches are typically about 30 microinches (0.000030”) deep. This crosshatch pattern provides just enough surface roughness to make the barrel oil-wettable.

If you were to examine the crosshatch pattern on a freshly honed cylinder barrel with a microscope, you’d see that the hone leaves a series of tiny peaks and valleys. It’s the valleys (fissures) of the microfinish that cause the surface to be oil-wettable by providing tiny footholds for the oil to hang onto.
However, the peaks (ridges) are problematic: They increase friction and wear, causing the barrels to run hot. The purpose of breaking-in a cylinder is simply to smooth off those pesky sharp little peaks to reduce friction and wear while leaving the sharp little valleys intact to provide oil-wettability.
It would be nice if this was done at the factory. Actually, it is to some extent: Some cylinders are manufactured with a multi-step honing process that partially smooths the sharp peaks. All factory engines and many field-overhauled ones go through a run-in period in an engine test cell that starts the break-in process (although this typically does not occur when cylinders are replaced in the field).
Whether the engine is new, rebuilt, overhauled, or simply fitted with one or more replacement cylinders, the final break-in is always up to the pilot who flies the first several post-maintenance flights.
Break-in basics
During normal engine operation, the goal is to lubricate the cylinder barrel with an oil film that is sufficiently strong and thick to prevent most metal-to-metal contact between the compression rings and the barrel walls. During break-in, however, the goal is just the opposite: to breach the oil film and cause sufficient metal-to-metal contact to grind off the sharp peaks of the crosshatch while leaving the valleys intact.

To accomplish this, we need to run the engine really hard for the first hour or two—hard enough to create greater-than-normal pressure on the compression rings. The semi-trapezoidal design of the compression rings uses combustion chamber pressure to force the rings tightly against the barrel walls. Break-in demands that this pressure be maximized to provide enough force to breach the oil film.
It’s also important to make sure that the oil film isn’t too strong to be breached, so the choice of break-in oil is important. Traditionally, break-in has been done using “straight mineral oil” that contains no synthetics, ashless dispersants, anti-wear/anti-scuff additives, or viscosity index improvers. In recent years, however, some manufacturers and engine shops have been moving away from using such primitive oil.
Synthetics have higher film strength than petroleum-based oils, which is obviously bad for break-in. Anti-wear/anti-scuff additives should also be avoided, since scuffing is precisely what we’re trying to achieve during break-in. However, I’ve seen no persuasive evidence that ordinary ashless dispersant (AD) oil is any less effective for break-in, and it keeps the engine cleaner, so I prefer to break-in on AD oil.
There is some controversy over whether it’s better to use single-weight oil or multigrade oil for break-in. Over the years I’ve mostly used Aeroshell W100 for break-in (with good success), but there’s a moderately persuasive argument that an all-petroleum multigrade oil such as Phillips X/C 20W-50 may be a better choice for break-in oil, and it’s what I used for break-in when I had the right engine of my Cessna 310 major overhauled in 2014 and did a top overhaul of the left engine.
For sure we want to avoid semi-synthetic oils like Aeroshell 15W-50, oils with anti-wear/anti-scuff additives like Aeroshell W100 Plus, and aftermarket anti-wear/anti-scuff additives like CamGuard or Lycoming LW-16702. Don’t use any of these, even if you’ve just replaced one cylinder, until you’re confident that break-in is complete.
Run it how hard?
Clearly the key to successful cylinder break-in is to run the engine hard during the first few hours of operation, to generate sufficient pressure on the compression rings to breach the oil film and grind off the sharp peaks. But how hard?
Ideally, we’d like to run the engine has hard as possible—close to full takeoff power would be optimum—for an hour or two. However, we need to be careful not to overheat the cylinders and damage the new cylinders. New cylinders will naturally run hotter than normal until the break-in process is largely complete. By far the best way to run the engine hard but not too hard is to use an engine monitor that instruments the CHT of every cylinder.
Here’s what I recommend: Break-in the engine by running it as close to maximum continuous power as possible without allowing any CHT to exceed 420°F for Continental cylinders or 440°F for Lycoming cylinders. Run it this hard for an hour or two until you see the CHTs come down noticeably, indicating that the lion’s share of break-in is complete.
It’s very important to run the engine hard right from the outset. Keep ground running to a minimum, avoid a protracted pre-flight runup, and don’t cycle the prop more than once (and as shallowly as possible). The reason for all this is that running a freshly honed cylinder at low power for any significant length of time can cause a condition known as “glazing” in which a tough residue of carbonized oil builds up on the cylinder walls and stops the break-in process dead in its tracks. Once the cylinder has become glazed, it’s no longer oil-wettable, and the only solution may be to remove and re-hone the cylinder and start the break-in process all over again.
Plated cylinders
Up to this point, I’ve been discussing break-in of conventional steel-barreled cylinders. There are also two types of electroplated cylinder barrels used regularly in piston aircraft engines: chrome-plated and nickel-plated. Chrome-plated cylinders are extremely hard and durable and utilize a non-honed channeling process to achieve the necessary oil-wettability. Nickel-plated cylinders employ carbide granules embedded in the plating for the same purpose.
The rules for breaking in these plated cylinders are much like those for ordinary steel cylinders. However, channel-chrome cylinders generally require more time to break in—sometimes 50 hours or more—and generally exhibit higher oil consumption than steel cylinders. Nickel-carbide cylinders, on the other hand, tend to break-in very quickly and have very low oil consumption.
You bought a plane to fly it, not stress over maintenance.
At Savvy Aviation, we believe you shouldn’t have to navigate the complexities of aircraft maintenance alone. And you definitely shouldn’t be surprised when your shop’s invoice arrives.
Savvy Aviation isn’t a maintenance shop – we empower you with the knowledge and expert consultation you need to be in control of your own maintenance events – so your shop takes directives (not gives them). Whatever your maintenance needs, Savvy has a perfect plan for you: