Is the conventional wisdom wrong about why exhaust valves burn?
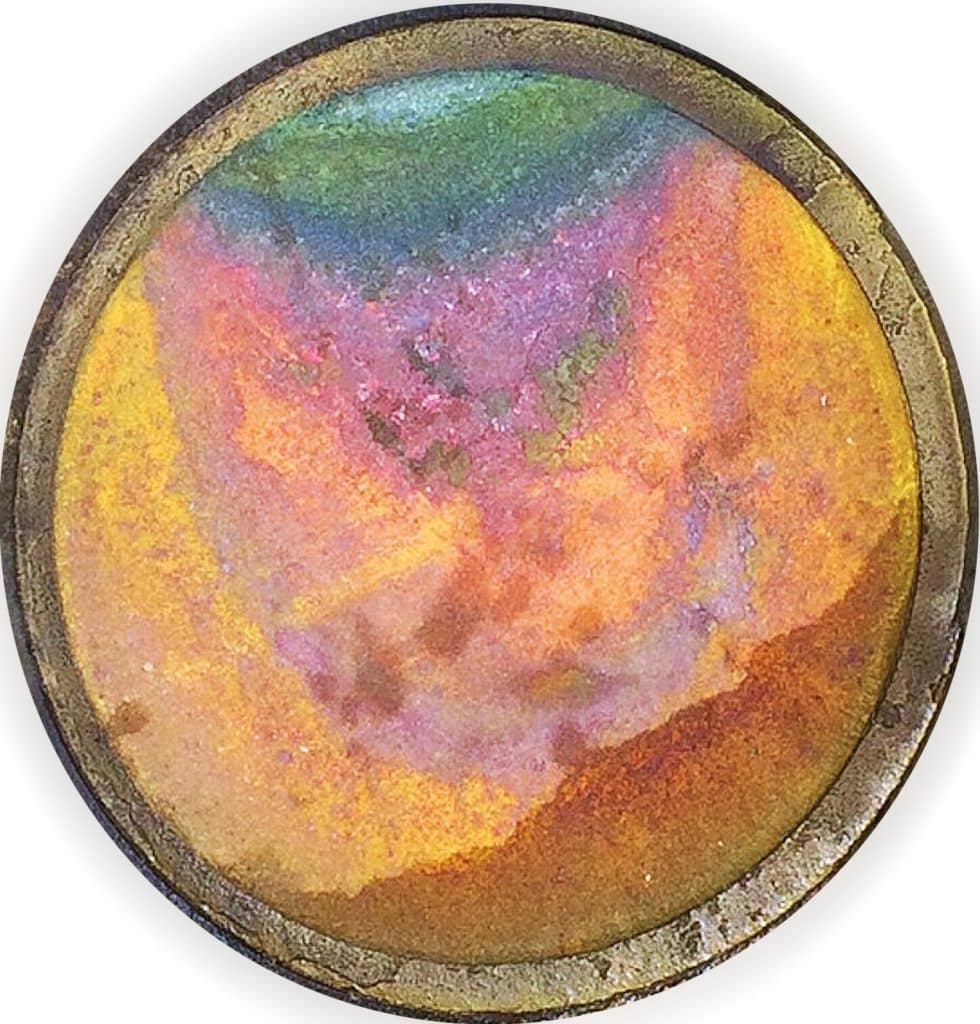
Piston aircraft engines have an awful lot of moving parts. Way too many, if you ask me. The thought of thousands of separate metal parts reciprocating, rotating, wiggling, wobbling, and rubbing against one another thousands of times a minute ought to make you nervous—it sure does me. It’s something I try hard not to think about while airborne, maintly because I fly a lot better when not distracted.
Of those thousands of moving parts, two kinds are the most worrisome: the ones most likely to blindside you with a costly, premature, unbudgeted-for engine overhaul or replacement, and the ones most likely to make you fall out of the sky (or at least soil your undies). The biggest offender in the safety-of-wallet category is the camshaft—and for Lycomings, the cam followers a.k.a. tappets—which prepresents by far the leading cause of premature engine teardowns. (Especially if you don’t count prop strikes, which you really shouldn’t since the prop isn’t part of the engine.)
In the safety-of-flight category, hands-down the most-wanted villains are exhaust valves. Exhaust valves can ruin you day in at least two different ways: they can stick or they can burn. Although these problems can occur in any piston aircraft engine, sticking is much more common in Lycomings and burning is more common in Continentals. I discussed sticky valves at length in the July 2020 issue of AOPA PILOT (“Why Valves Stick”)—hint: the answer is “leaded avgas”— so this column will focus on what we’ve learned about burned valves.
Don’t Blame the Pilot
After I purchased my first airplane in 1968—a new Cessna 182 powered by a Continental O-470-R—it didn’t take long for me to recognize that exhaust valves were the most vulnerable components of my engine. Burned exhaust valves were the principal reason that cylinders flunked the annual compression test—in those days, anything less than 60/80 was considered unairworthy and condemned the cylinder to removal and replacement or rework. Mechanics invariably blamed burned exhaust valves on pilot mismanagement of the powerplant, and warned us not to lean our engines aggressively so we wouldn’t overheat the valves and cause them to burn. The standard A&P mantra was “fuel is cheaper than engines.”
Single-probe EGT gauges were just coming into vogue then, and we were taught that the best way to prevent exhaust valve problems was to avoid operating at excessive EGTs. The implication was that EGT was a good proxy for exhaust valve temperature, and that keeping EGTs cool would assure that exhaust valves wouldn’t overheat.
This all sounded logical and convincing at the time, and most of us believed it. But it turned out to be complete hogwash!
If high EGTs were the cause of exhaust valve burning, then low-compression engines like the O-470-R in my Skylane would suffer more burned exhaust valves than high-compression engines like the IO-520-K in the Bellanca Viking I owned after I sold the Skylane. After all, a high-compression engine inherently has much lower EGTs than a low-compression engine does, because the high-compression engine is more efficient at converting the heat energy liberated during combustion into mechanical energy (horsepower) and so wastes less heat energy out the exhaust. That wasted heat energy is what we see in the cockpit as EGT, and it’s inversely correlated with compression ratio.
Of course, it’s simply not true that high-compression engines suffer fewer burned exhaust valves than do low-compression engines. There is simply no statistically significant correlation between EGT and exhaust valve burning. It’s a myth.
Nor is aggressive leaning the culprit. In the 3,300 hours that I put on the 12 cylinders of the Continental TSIO-520-BBs in my Cessna Turbo 310 before finally retied them, I never suffered a single burned exhaust valve—not one—and those engines were always leaned very aggressively, almost exclusively lean-of-peak except for takeoff and initial climb.
No, when an exhaust valve burns, it’s almost never the fault of the pilot. This turns out to be just another old wives’ tale. But if it’s not the pilot’s fault, whose fault is it?
Well, the short answer is that it’s generally the fault of the hardware. And that’s where the story really starts to get interesting.
Exhaust Valves Survival Strategies
Exhaust valves must survive in an atmosphere of incredibly hot and corrosive gas whose temperature can reach 4,000˚F at the peak pressure point of the combustion event. To make matters worse, the valve stem must oscillate smoothly through a valve guide without benefit of lubrication (since the stem runs so hot that engine oil would just carbonize). It’s a miracle that these valves last as long as they do.
Key to the exhaust valve survival is the valve’s ability to shed this intolerable heat by transferring it to the cylinder head, which acts like a giant heat sink for the valve. There are two ways the valve can transfer its heat to the cylinder head: via contact between the valve’s head and the valve seat (when the valve is closed) and via contact between the valve’s stem and the valve guide (constantly).
Continental and Lycoming employ subtly different construction and heat-sinking strategies for their exhaust valves. Continental valves have solid stems and heads made of an exotic nickel-chromium superalloy called Nimonic® known for its high-temperature, low-creep characteristics.
Lycoming valves are made of not-so-exotic stainless steel but have hollow stems partially filled with metallic sodium that has the consistency of toothpaste at room temperature, an unusually low melting point (208˚F) and high boiling point (1,621˚F), plus exceptional thermal conductivity. The sodium liquifies as the valve starts to heat up, sloshes back and forth inside the hollow valve stem, and greatly improves transfer of heat from the head of the valve to the stem.
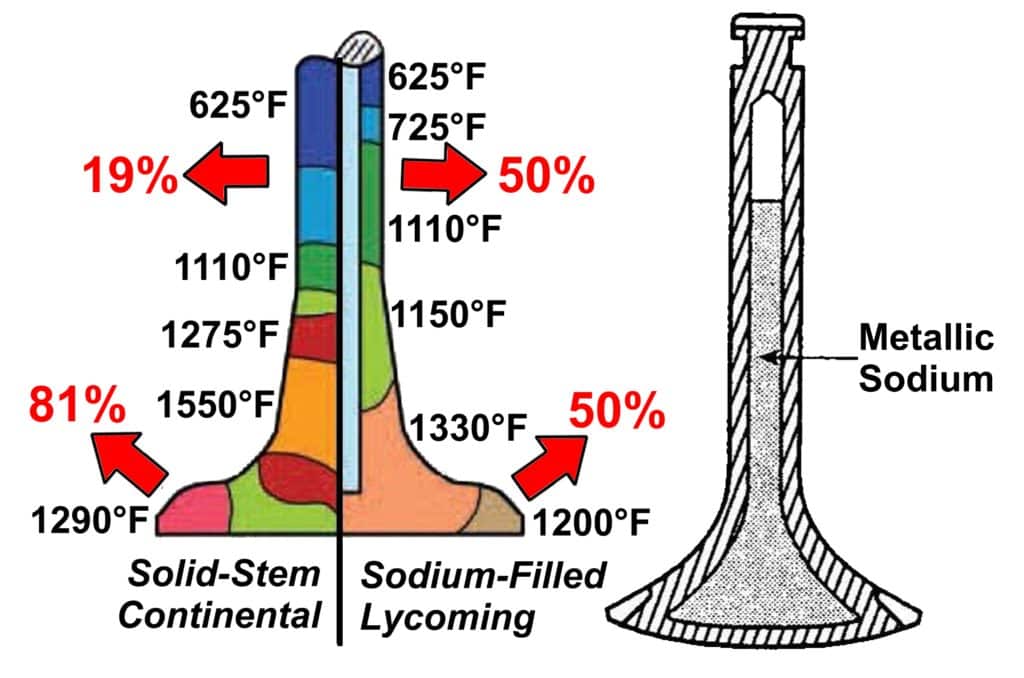
As the graphic indicates, Continental’s solid-stem exhaust valves shed their heat predominantly through contact between the valve head and the valve seat, while heat dissipation of Lycoming sodium-filled valves is split evenly between the head-to-seat interface and the stem-to-guide interface. That’s why a close-tolerance fit between the stem and guide is essential to the survival of Lycoming valves, while Continental valves can usually cope with sloppy-fitting guides so long as the head of the valve makes firm, leak-free contact with the seat throughout its entire 360˚ circumference when the valve is closed (which it is about two-thirds of the time).
Threats to Survival
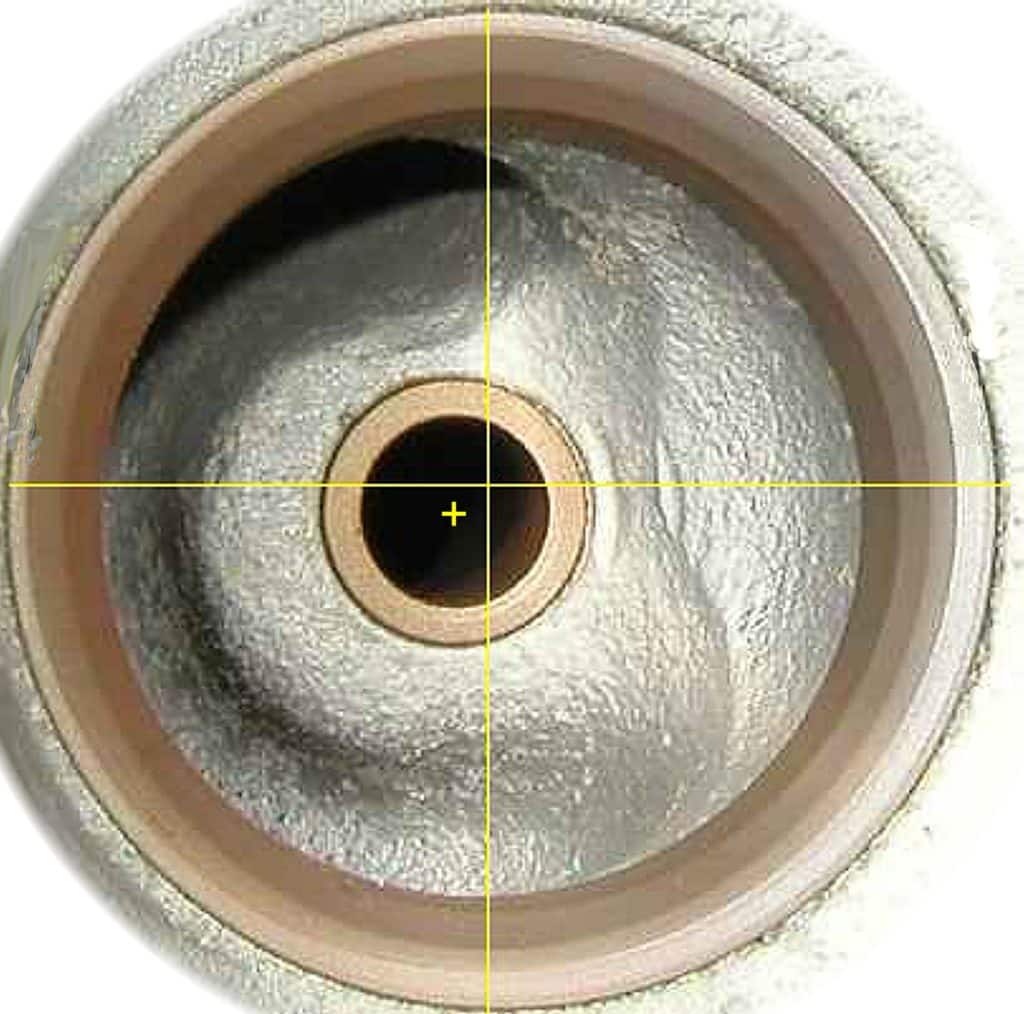
Exhaust valves burn when the heat transfer path from the valve to the cylinder head is compromised. If the valve loses its heat sink, it can overheat and start to warp and possibly start to crack around the edges. This causes it to lose its seal with the valve seat, allowing extremely hot combustion gas to leak past the valve during the hottest part of the combustion event when the valve is supposedly closed. The escape of this extremely hot gas results in metal erosion and warping, which increases the leakage of hot gas past the valve. Lather, rinse, repeat, and pretty soon the valve is toast.
Sometimes this is baked into the cake when the cylinder leaves the factory or the engine shop. For example, if the valve guide and valve seat are not perfectly concentric, the valve won’t seal perfectly around its entire 360˚ circumference. There was a period of years during the 1990s when the Continental factory stopped “post-reaming” valve guides after they were installed in the cylinder, and instead was pre-reaming them prior to installation. That turned out to be a really bad idea and resulted in serious concentricity issues. We started seeing large numbers of Continental exhaust valves burned after just 400-500 hours in service. Eventually, Continental went back to their tried-and-true post-reaming process and the concentricity problems largely went away. (For awhile at least…read on.)
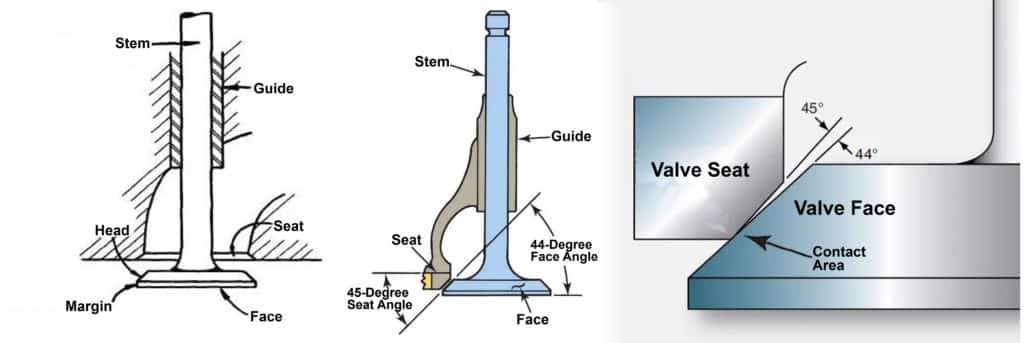
Grinding the valve so it makes proper contact with the seat is harder than it sounds. The overhaul manual calls for the face of the valve to be ground at a slightly different angle than the seat angle in order to provide a narrower contact footprint that will seal better. It turns out that this is tricky business. If the contact area is too wide the valve won’t seal well, but if it’s too narrow the heat transfer path from the valve face to the seat is compromised. Valve and seat grinding is as much of an art as a science, and some engine shops do it better than others. Doing it right is particularly important for Continental valves because they are so dependent on face-to-seat heat transfer.
Lycoming sodium-filled valves are more dependent on the stem-to guide heat transfer path, so worn guides that have a sloppy fit to the valve stems can lead to burned valves. This is one reason that Lycoming recommends regular “wobble testing” (Service Bulletin 388C) to check for play in the stem-to-guide interface. This is much less important for Continental engines, which tolerate worn guides far better.
Failure to Rotate
Rotation is also essential to exhaust valve survival. Most Continentals and Lycomings employ exhaust valve rotators—Lycoming calls them “rotator caps” and Continental calls them “rotocoils”—that cause the valve to rotate a fraction of a degree each time the valve opens. At typical cruise RPM, the valve typically rotates a full 360˚ each minute.
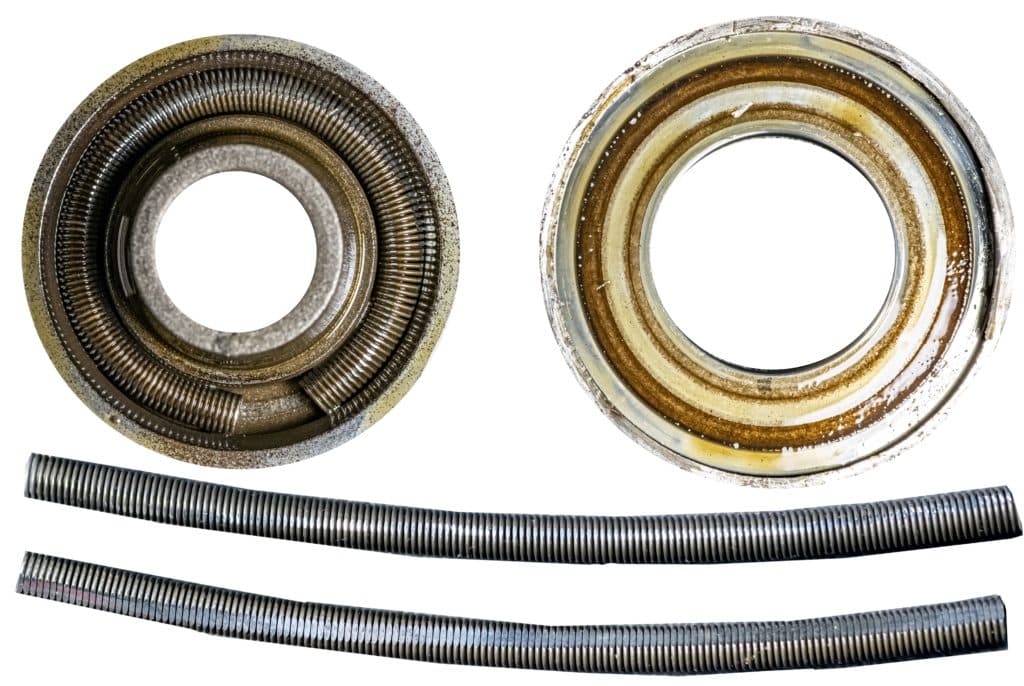
Exhaust valve rotation accomplishes two things: It ensures that the heat load is spread evenly and symmetrically across the face of the valve and prevents the development of hot spots that can cause the valve to warp and then to burn. Rotation also helps prevent the formation of deposits on the valve seat that can interfere with the valve’s ability to seal properly.
In recent years, we’ve been finding an increasing number of burned valves caused by failure of the rotator, particularly in Continental engines. My colleague Dave Pasquale A&P/IA who operates Pasquale Aviation in Pottstown, Pennsylvania has done extensive research on this, and many of the photos in this column were provided by Dave.
The Continental rotocoil contains a garter spring that gets laterally “squished” every time the valve opens, and it’s the squishing of the spring that produces the rotation. Unfortunately, this squishing action also causes the spring to wear and eventually it wears enough that the rotocoil stops rotating the valve. Once that happens, it doesn’t take long for the non-rotating valve to develop a hot spot and eventually burn beyond salvation.
We’ve had the feeling that these rotocoil failures are happening a lot more frequently than they used to. There may be a good reason for this. It turns out that Continental’s vendor (Federal-Mogul, formerly TRW) made some subtle changes to the rotocoil that seem to have adversely affected its longevity. The older rotocoil (part number 629117) used a larger-diameter garter spring and was held together by a circlip, while the current rotocoil (part number 652112) uses a smaller-diameter garter spring, has no clip, and seems to be failing more quickly, sometimes after as few as 500 hours.
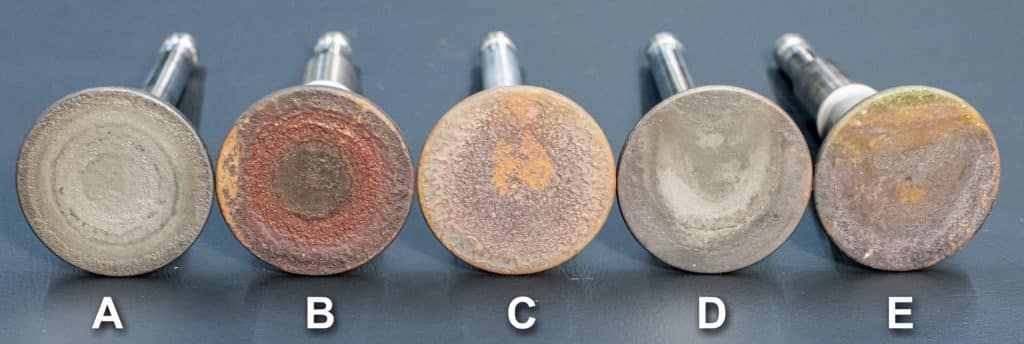
The good news is that it’s pretty easy to detect exhaust valves that have stopped rotating simply by inspecting them with a borescope. A valve that it rotating propertly will have a symmetrical appearance the way valves A and B in the lineup do. Valve A is cleaner because it has been operated mostly LOP, while valve B has more deposit buildup because it has been operated mostly ROP, but both are symmetrical and healthy-looking. Valve C exhibits subtle signs of asysmmetry, probably because its rotocoil has started to fail. Valve D is profoundly asymmetric and definitely not rotating, though it hasn’t burned yet and might just need a new rotocoil. Valve E is also not rotating and has started to burn, though there’s a good chance the valve could be saved by lapping in place and installing a new rotocoil.
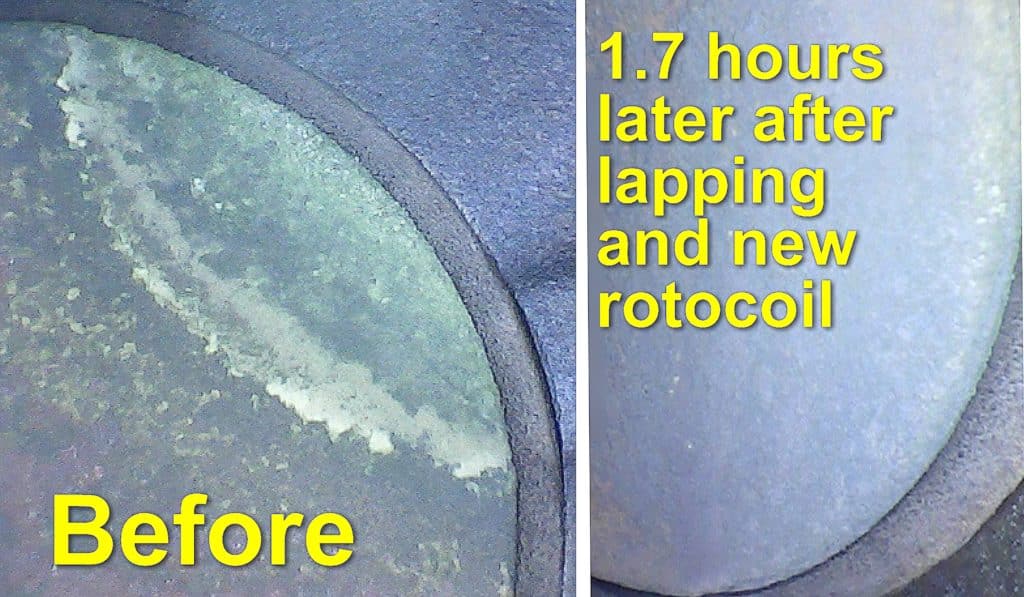
It’s amazing how quickly a failing valve can heal if it’s caught early enough. Look at the striking before-and-after photo I received from Dr. Gary Silver A&P/IA who owns, flies and maintains a Cessna 421 powered by a pair of Continental GTSIO-520s. The photo shows a borescope image of a badly burned #4 exhaust valve in Gary’s left engine, and another image of the same valve only 1.7 hours after Gary lapped it in place and replaced the failed rotocoil. Remarkably, the nasty hot spot has almost completely disappeared.
What About Lycomings?

Lycoming exhaust valves use a completely different style of rotator and we don’t see them fail nearly as often, but it does happen occasionally. The Lycoming rotator is a small cap that sits on top of the valve stem, and the photo shows one that exhibits a deep linear groove worn by the tip of the rocker arm—a sure sign it’s not rotating. This one made it to 1,362 hours before the failure was discovered. Lapping the valve and replacing the rotator cap resulted in a much healthier-looking valve when it was borescoped again 10.7 hours later.
Here are the key takeaways: Burned valves aren’t your fault, they’re almost always a hardware problem. If you inspect your cylinders frequently (at least every 100 hours, 50 would be even better), you can catch valve issues early and avoid the need for cylinder removal. The borescope will show whether the valve is a viable candidate for lapping in place. Always replace the rotator when you do this. A follow-up borescope inspection 10 to 25 hours later will hopefully confirm you dodged the bullet. Pulling the jug should always be treated as the last resort.
You bought a plane to fly it, not stress over maintenance.
At Savvy Aviation, we believe you shouldn’t have to navigate the complexities of aircraft maintenance alone. And you definitely shouldn’t be surprised when your shop’s invoice arrives.
Savvy Aviation isn’t a maintenance shop – we empower you with the knowledge and expert consultation you need to be in control of your own maintenance events – so your shop takes directives (not gives them). Whatever your maintenance needs, Savvy has a perfect plan for you: